Sunday, September 27, 2009

Amy Butler Weekender: Cutting, cutting, and more cutting...


So now that you've purchased all of the materials, you've got to cut out the pieces. Give yourself a good chunk of time for this or spread it out because it has taken me hours to measure and cut out the pieces. Also, if you plan on making more than 1 Weekender, you can save time by tracing the pattern pieces and measuring out the rectangular pictures onto tracing paper and cutting out the tracing paper...so you can preserve the pattern. I hate cutting out original pattern pieces...although I know they're meant to be cut out. If you trace out all of the pieces onto tracing paper, you'll never risk loosing a piece of the original pattern because the original pattern stays in tact. Also, since there are many parts of the bag that don't have a pattern, they require you to take a ruler/yardstick and measure out the pieces...so you might as well do the measuring once onto tracing paper and you'll never have to measure again on future bags!

The revised instructions address one of the main frustrations with the bag...sewing through the peltex/timtex. The instructions tell you to trim away .5 inch from the edges of the original pattern pieces for the peltex/timtex pieces so that you don't have to sew through it. You might as well create pattern pieces for the peltex/timtex pieces also, to save you the hassle of cutting off .5 inch from the original pieces.
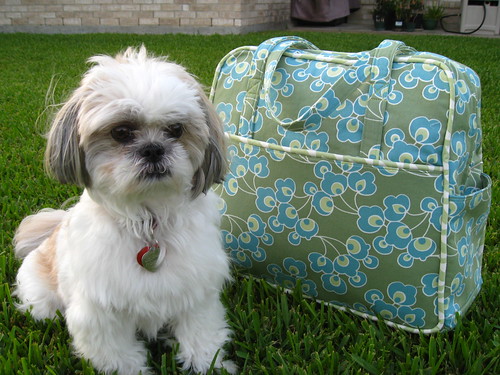
I generally follow the revised instructions on how to lay out the pattern pieces, but I try to waste as little fabric as possible so sometimes, I tweak the layout. By wasting as little fabric as possible, I'm able to have enough fabric left over to create internal pockets (the original pattern doesn't include any internal pockets). Also, if you have a distinct pattern on your fabric (like the exterior fabric that I purchased) and you want your pockets to line up with the fabric, you have to pay extra attention to your layout. You may also want to purchase an extra half yard of your fabric if you're unsure. The handles and top of the bag (where the zipper is) require the longest parts of the fabric so make sure you don't improvise too much on your layout and not have enough continuous fabric for your handles and top of the bag.

Not counting the pattern pieces that you have to cut out from tracing paper, expect to cut about 70 pieces, including the strips you have to cut for the piping. That's including the extra 1 large interior pocket that's the same size as the exterior pockets, 2 small interior pockets that are the same size as the 2 small exterior pockets, 1 zipper pocket inside the lining, and 2-sided handles (the instructions call for using the interior fabric for both sides of the handle...I like using the exterior fabric for one side, and the interior fabric for the other side...suggestion courtesy of hiuma). I also lengthened the handles from 48" to 56" so it'll fit over your shoulders easier.

Thursday, September 24, 2009

Amy Butler Weekender: Purchasing the materials...

My friend Grace, who is a very awesome knitter, was admiring my bag one day and instead of her learning how to sew and me learning how to knit, we decided to barter =)! I would make her a weekender and she would knit me an Every Way Wrap and a hat. Being the speedy and dedicated person that she is, she has already finished my wrap and I have barely started her bag! I blame the fact that I'm traveling to Denver every week for work and I only have time to sew on the weekends at home. Hubby thinks I should buy a cheap sewing machine here in Denver and sew on the weekdays so that I can get it done faster. Until then, the progress will probably be very slow. Sorry!

Ok, so you want to make an Amy Butler Weekender bag? First off, after buying the pattern, make sure you print/download the revised material list and instructions on Amy Butler's website. Second off, it isn't a cheap bag to make...especially if you use designer fabric. Here's what a breakdown of my costs for grace's bag look like:

Purchased from Fabric.com:
- 2 yards of Amy Butler Nigella Twill Primrose Nickel ($29.96) for the exterior
- 2 yards of Amy Butler Nigella Twill Wood Fern Silver ($29.96) for the lining
- .5 yards of medium weight linen indigo ($5.99) for the piping (the lining fabric can also be used for the piping; add .5 yards to lining fabric if using lining fabric for piping)
- 2.5 yards of Peltex Sew-In Ultra Firm Stabilizer ($12.95)
- 5 yards of cotton piping size 1 or 3/16" ($.22) for the piping
- 4 nickel 14mm purse feet ($2.59) you actually need 6 purse feet, but I had 2 purse feet leftover from when I purchased 8 purse feet for my first bag
Subtotal: approx. $66 (that's with free shipping and 25% off my entire purchase; you'll also need to purchase the pattern (~$12))

Purchased from Jo-Ann Fabrics:
- 1 30" dual-separating zipper (~$4) - this allows you to unzip the bag from either end of the bag
- 1 9" all-purpose zipper (~$3) - this is optional; only purchase if you are sewing an internal zipper pocket into the lining
- 1 sheet of 12” wide x 18” long Heavy Duty Template Plastic from Prim-Dritz™ (found with the quilting supplies) (~$3)
- 3.75 yards of 20" wide fusible woven interfacing (~$12)
- 2 spools of coordinating thread (~$4) - the instructions say 1 spool, but I would buy 2 to be on the safe side
Subtotal: approx. $16 (that's with making several trips and using 40% off coupons)

Total: approx. $82

The only area that you can probably save the most money is to use cheaper decorating weight fabric...but if you're going to spend so much time on sewing a bag, you might as well choose a fabric that you love!

Amy Butler Weekender: A Step by Step Commentary

trinity with my newly finished amy butler weekender bag

After I made my first Amy Butler Weekender Travel Bag, I decided that I wanted to empower novice sewers with the ability to make their own Amy Butler Weekender Travel Bag.

I recently learned how to sew back in April of 2009 (thanks to my hubby who bought me a sewing machine and lessons at Sew Crafty Houston for my birthday). After learning how to make a pillow case, simple tote bag, and pajama pants, I decided to try my hand at the Amy Butler Goddess Apron. After making 2 aprons, I decided to take a shot at the weekender.

I first went online to read reviews of the pattern. I stumbled upon several blogs with helpful tips and pictures. All of the blogs talked about how difficult it was to make the bag because of all of the layers and piping. But they also mentioned that the finished product was worth all of the finger pricks, seam ripping and re-sewing, and long hours.

So before I start documenting the process of making my second weekender, I want to give credit where credit is due. These are the blogs that provided the helpful hints and pictures and helped make my first weekender a success:
The Lint Knitter
Miss Behave
craftoholic
all buttoned up
hiuma
wise craft
needle book
sewpixie - tutorial on how to make a pocket inside the lining of the bag

Thank you for sharing your tips and beautiful bags...I hope my blog posts will help others as much as those above have helped me!

time for my own blog

i decided to break away from gordonandyvonne.blogspot.com and create my own blog about my crafting, sewing, and baking exploits. the impetus was when my most recent blog post about sewing showed up on gordo's facebook! plus, i'm on a year long project in denver and since i'm here by myself most of the time, i figured i could spend my free alone time by doing something productive like blogging...hah.

my dream is to create a following and one day open a craft/bake shop.

my first series of blog posts will be a step by step commentary on sewing the Amy Butler Weekender Travel Bag. i hope someone benefits from these blog posts!